Panel Overview
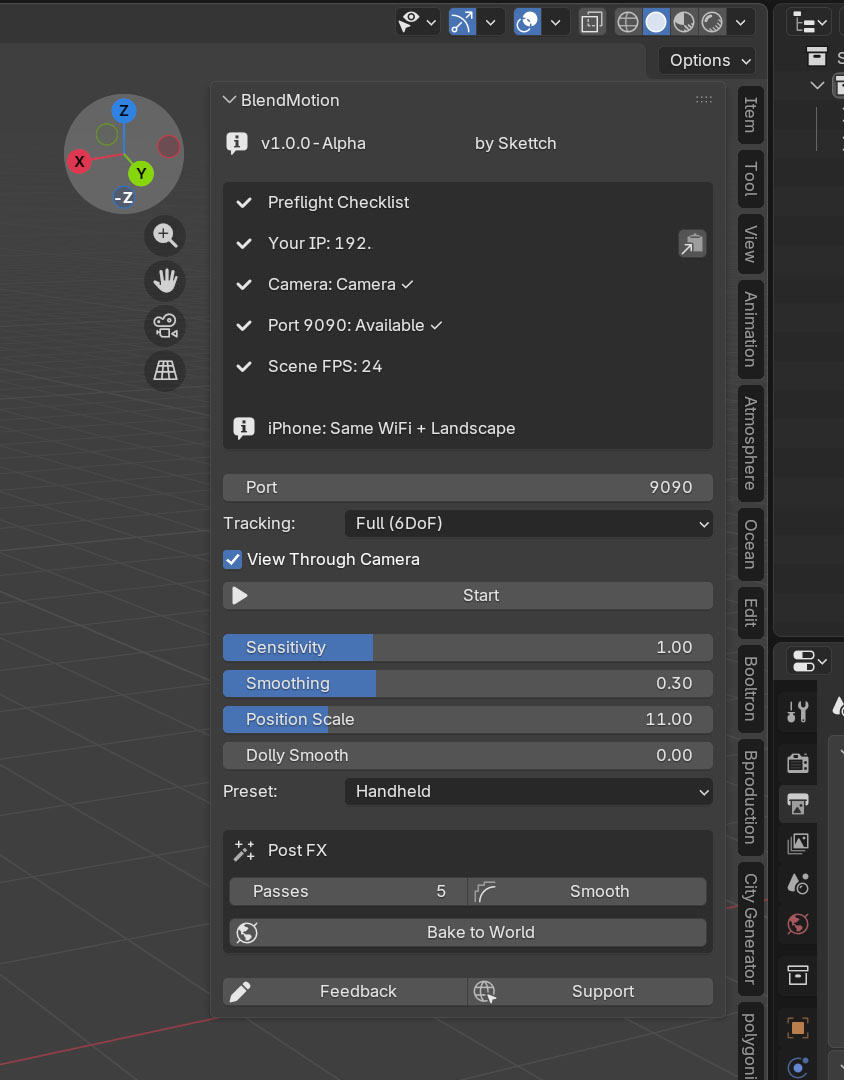
The BlendMotion Panel
The BlendMotion panel lives in Blender's 3D Viewport Sidebar. Open it by pressing N in the viewport, then click the BlendMotion tab.
The panel is organized from top to bottom in the order you'll use it:
| Preflight | Auto-checks your setup before you start |
| Port | UDP port for communication (default 9090) |
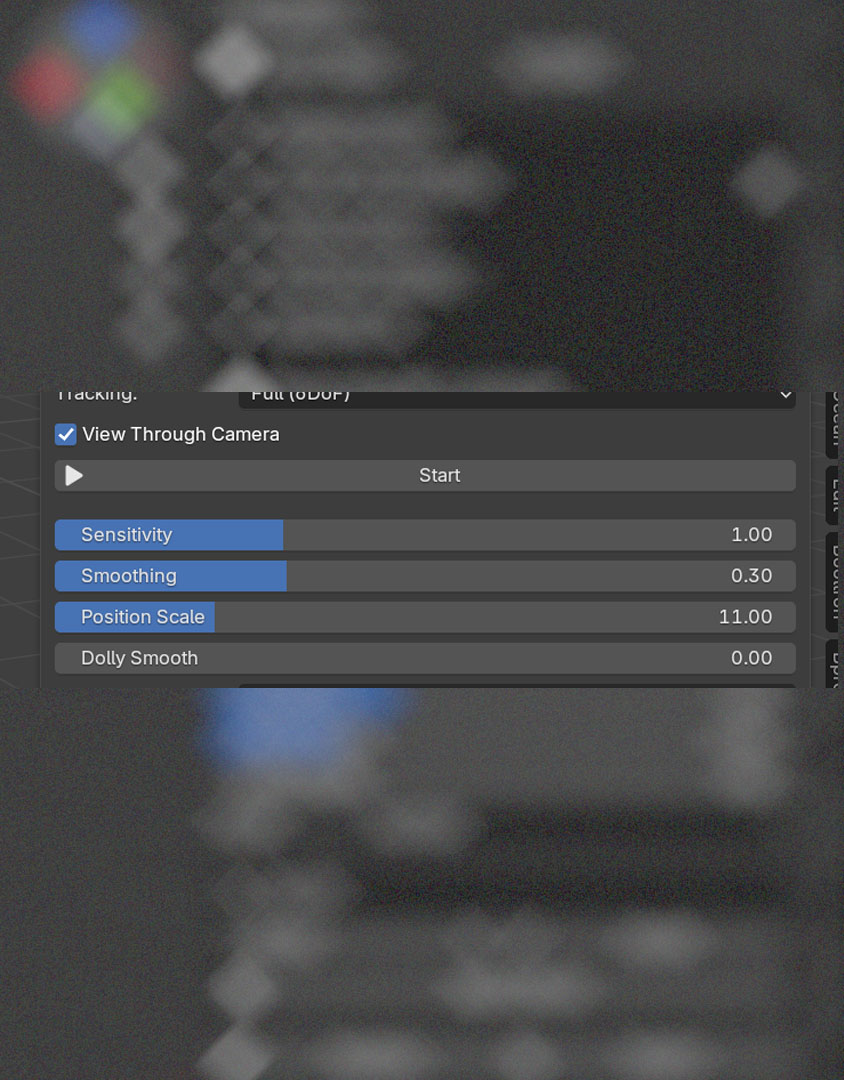
| Tracking | Choose Full 6DoF or Rotation Only |
| Controls | View Through Camera toggle and Start/Stop |
| Sliders | Sensitivity, Smoothing, Position Scale, Dolly Smooth |
| Presets | One-click parameter sets for common use cases |
| Post FX | Post-recording tools: Smooth and Bake to World |
Preflight Checklist
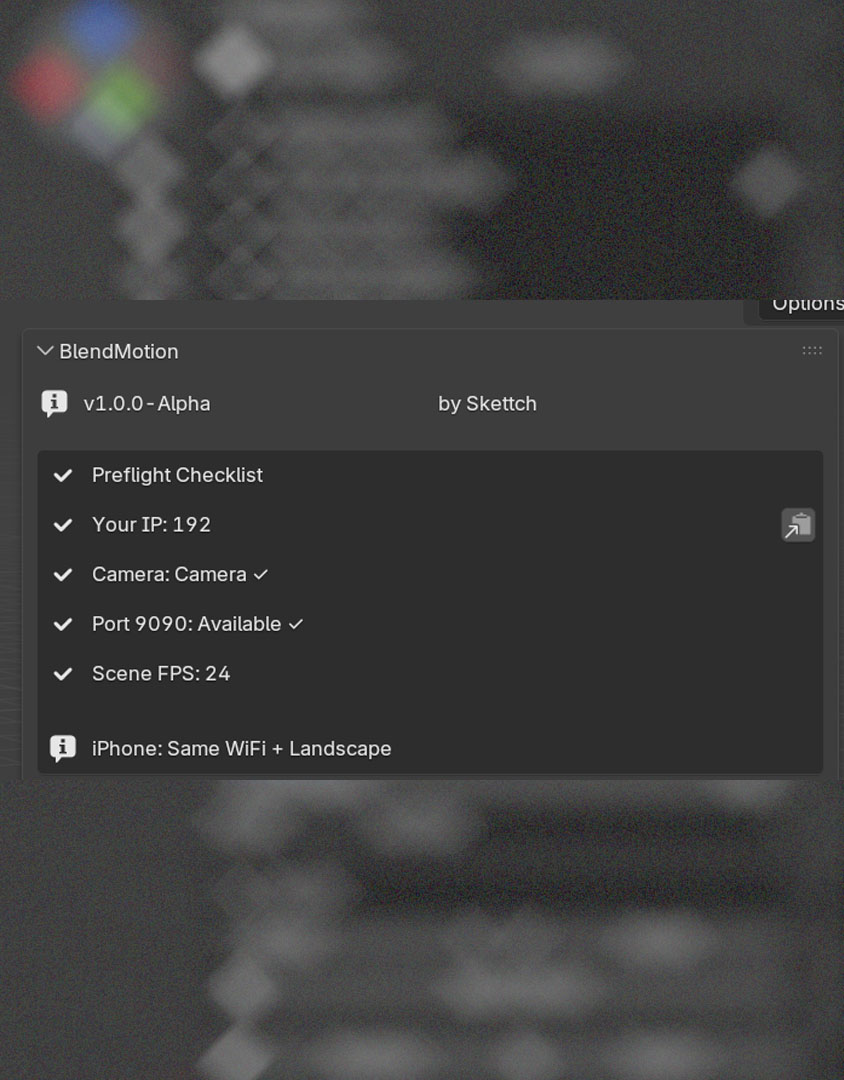
Automatic Setup Verification
The Preflight Checklist runs automatically every time you open the panel. It verifies everything you need before connecting your iPhone.
| Your IP | Your computer's local IP address on the current Wi-Fi network. Click the 📋 copy button to copy it, then paste it into the iPhone app. |
| Camera | Confirms your scene has an active camera. If not, add one with Shift+A → Camera and press Ctrl+Numpad 0 to set it as active. |
| Port | Checks that the selected UDP port (default 9090) is available and not in use by another application. |
| Scene FPS | Shows your current scene frame rate. Recording keyframes will use this FPS value. |
The ℹ️ reminder at the bottom reminds you to keep your iPhone on the same Wi-Fi network and to hold it in landscape orientation.
Port
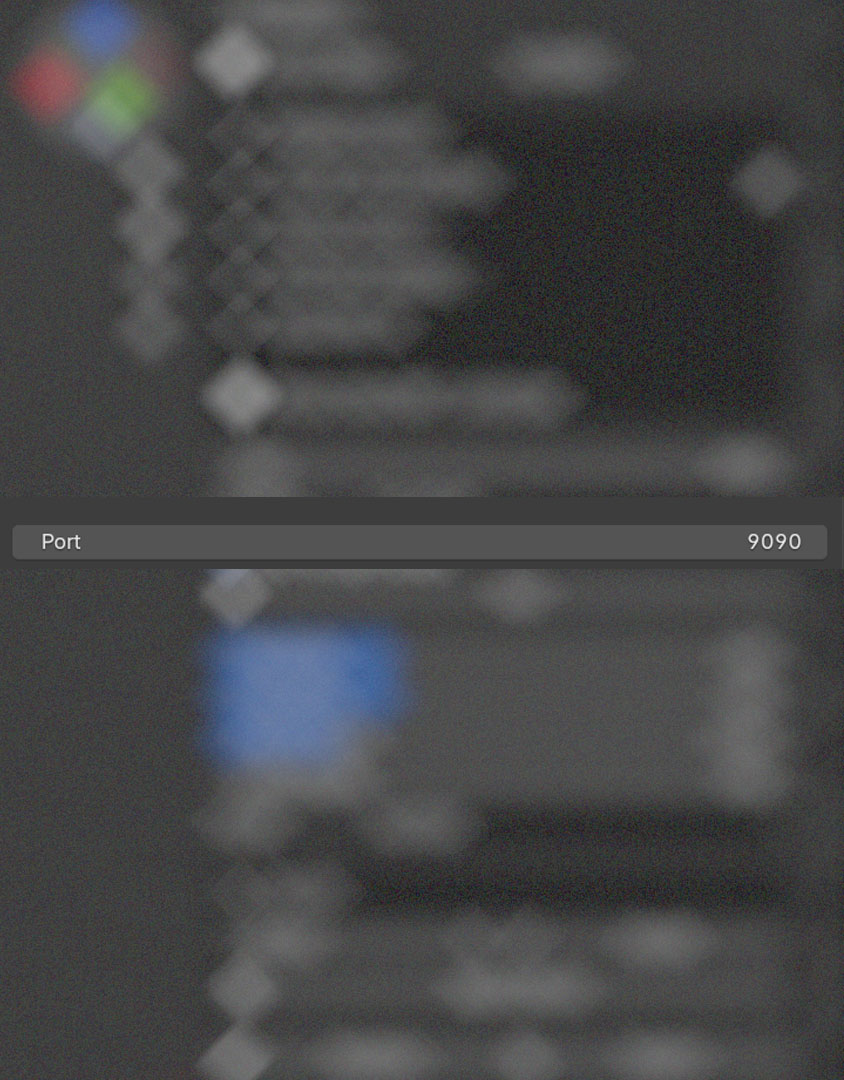
UDP Communication Port
This is the UDP port BlendMotion uses to receive motion data from your iPhone. The default value is 9090 and works for most users.
| Default | 9090 |
| Range | 1024 – 65535 |
| Protocol | UDP (low-latency, no handshake) |
If port 9090 is already in use by another application, the Preflight Checklist will warn you. Simply change the port number here and use the same port in the iPhone app.
Tracking Mode
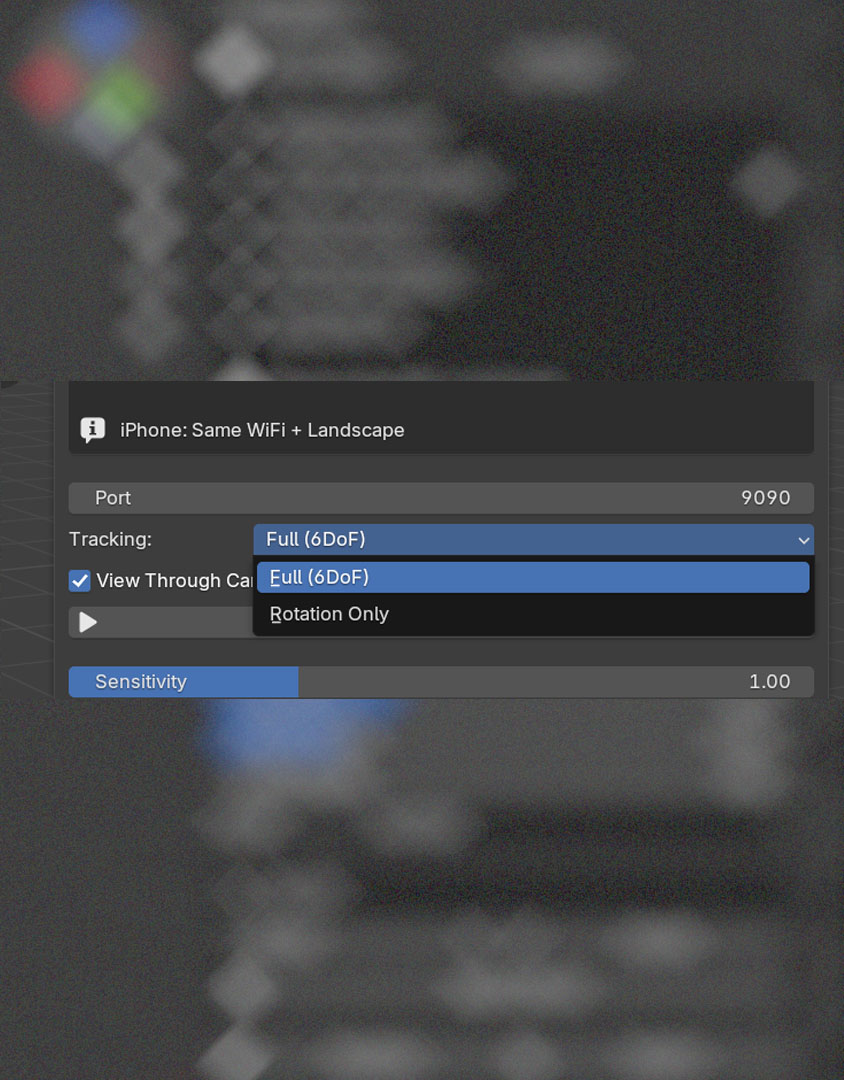
Choose How Your Camera Moves
The Tracking Mode dropdown lets you choose between two motion capture modes:
| Full (6DoF) | Default. Tracks both rotation (pan, tilt, roll) and position (forward, sideways, up/down). Use this for handheld shots, walk-throughs, and any scene where the camera physically moves. |
| Rotation Only | Tracks only rotation. The camera stays locked in place. Perfect for tripod shots, panoramic sweeps, look-around scenes, or when your camera is parented to an object and you only want to add organic rotation on top. |
When Rotation Only is selected, the Position Scale slider is automatically hidden since it doesn't apply.
Predictive Compensation since v2.1.0
Latency Hiding for Fast Camera Moves
The path from your iPhone's ARKit sensor to a Blender keyframe is short but not free: capture, encode, Wi-Fi, decode, queue, draw. End-to-end it sits around 30 ms in a healthy setup. On slow, deliberate moves that's invisible. On fast pans it shows up as the camera in Blender lagging slightly behind your hand.
Predictive Compensation hides that gap by extrapolating where the camera will be ~30 ms from now, using the most recent velocity. When the actual frame arrives, it blends back to the truth.
| Toggle | Tracking panel — Predictive Compensation. Default on. |
| Latency cap | 80 ms ceiling. Most Wi-Fi setups land around 20–40 ms. |
| Direction reversals | Quaternion shortest-path math + identity-near skip. No overshoot on whip pans. |
| Failure mode | Defensive fallback to the last good frame. If the prediction would produce nonsense (NaN, huge delta), the raw frame wins. |
Adaptive Smoothing since v2.2.0
Smoothing That Reads the Shot
A single smoothing value is a compromise: enough to clean up slow handheld shots makes fast pans feel sticky; enough to keep fast pans responsive leaves slow shots jittery.
Adaptive Smoothing measures how fast you're moving and slides between two values you set — high smoothing for slow, low smoothing for fast.
| Toggle | Tracking panel — Adaptive Smoothing. |
| Min Smoothing | Applied during fast motion (whip pans, snap reframes). Lower = more responsive. |
| Max Smoothing | Applied during slow / static motion. Higher = creamier. |
| Blend | Continuous, based on measured motion magnitude. No discrete tiers, no audible click between modes. |
Controls
View Through Camera & Start
| View Through Camera | When checked, the 3D viewport automatically locks to the active camera view when tracking starts. This way you see exactly what the camera sees in real time. Uncheck if you want to observe the camera from a different angle while tracking. |
| Start / Stop | Click Start to begin listening for iPhone data. The button changes to Stop while active. The panel will show "Connected" with your iPhone's IP once the first packet arrives. |
Once connected, additional controls appear: Recalibrate (resets the origin point to your current hand position) and a live status display showing rotation and position values.
Sliders
Fine-Tune Your Camera Motion
Sensitivity — Controls how much the Blender camera rotates relative to your phone movement.
| Range | 0.10 – 3.00 |
| Default | 1.00 (1:1 tracking) |
| Low (<1.0) | Dampens rotation — good for large sweeping motions |
| High (>1.0) | Amplifies rotation — good for small desk movements |
Smoothing — Reduces hand shake for smoother, more cinematic motion.
| Range | 0.00 – 0.95 |
| Default | 0.30 |
| 0.0 | No smoothing — raw, direct tracking |
| 0.3 – 0.5 | Recommended for most use cases |
| >0.7 | Very smooth, but adds noticeable lag |
Position Scale — Multiplies your physical movement distance in Blender. updated v1.4.0
| Range | 0.10 – 12.00 |
| Default | 1.00 (real scale — 1 m in your room = 1 m in Blender) |
| Low (<1) | Tabletop / small-scale scenes |
| High (>3) | Large architectural / landscape scenes |
Dolly Smooth — Extra smoothing for position only. Most useful when your camera is parented to an object.
| Range | 0.00 – 0.95 |
| Default | 0.60 |
| Use case | Smooths out position jitter on dolly/crane rigs while keeping rotation responsive |
Presets
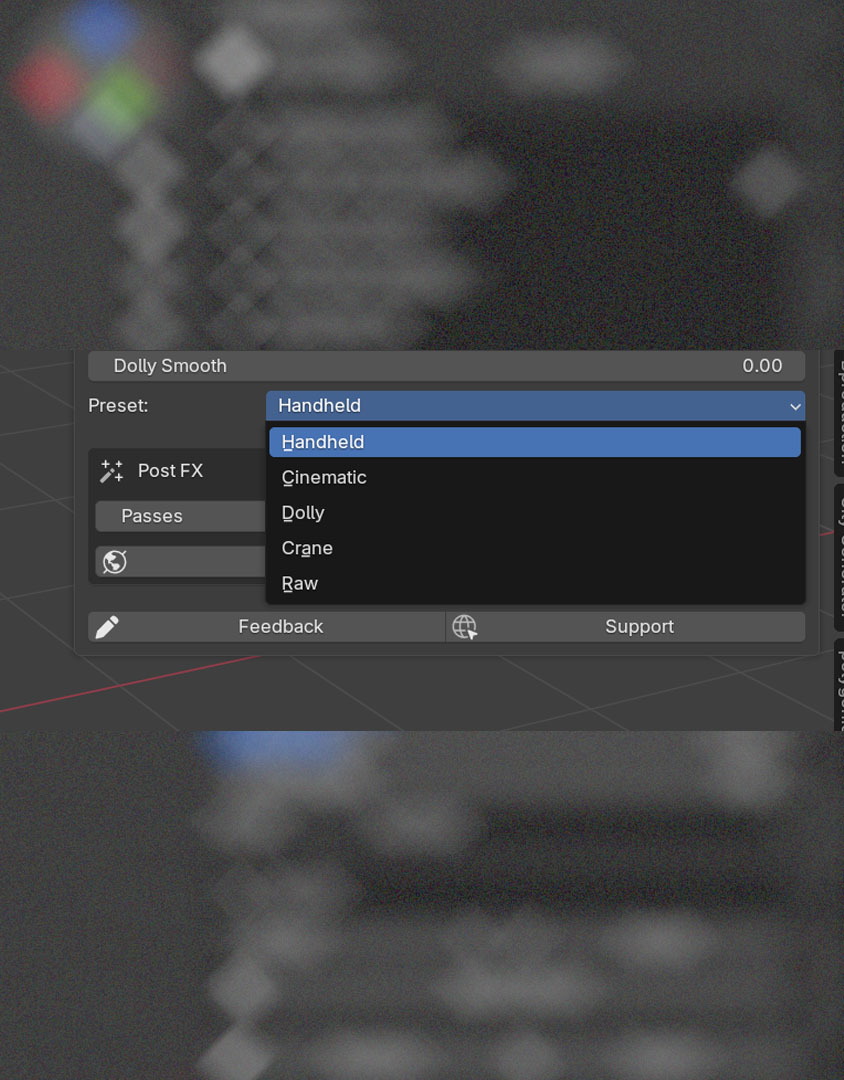
One-Click Parameter Sets
Presets instantly configure all four sliders for common shooting styles. Select a preset and the sliders update automatically.
| Preset | Sens. | Smooth | Pos Scale | Dolly |
|---|---|---|---|---|
| Handheld | 1.0 | 0.3 | 5.0 | 0.0 |
| Cinematic | 0.6 | 0.7 | 3.0 | 0.0 |
| Dolly | 0.8 | 0.5 | 8.0 | 0.6 |
| Crane | 0.5 | 0.8 | 12.0 | 0.7 |
| Raw | 1.0 | 0.0 | 5.0 | 0.0 |
Handheld is the default and works well for general-purpose tracking. Cinematic adds extra smoothing for polished results. Dolly and Crane are designed for cameras parented to rigs. Raw gives you zero smoothing for direct 1:1 tracking.
Live Animation since v2.0.0
Animated Scenes While You Track
Two controls let you decide how much of your scene is alive while the camera is being tracked. They share the same depsgraph cost — that's why they were grouped together in v2.3.1 with a heavy-scene warning.
Live Preview Rate since v2.0.0
| Off | The scene doesn't advance during tracking. Lowest cost. Good for heavy scenes or when you only care about the camera path. |
| Slow / Medium / Fast | The timeline cursor advances during tracking so animated objects move. Higher rates = more depsgraph evaluations per second = heavier load. |
Allow Playback since v2.0.0
| What it does | Lets Blender's actual playback (Spacebar) run while tracking. Useful when you want to drive the camera through a scrubbing animation. |
| Default | Off — on some setups concurrent depsgraph access can crash Blender. If it crashes on your machine with the toggle on, just leave it off. |
| Race-condition guard | Non-parented cameras get an atomic matrix_world write to keep the camera transform consistent during playback. |
| Override note | When on, Live Preview Rate's Off setting is overridden — playback drives the cursor anyway. |
Phone Preview since v1.2.0
Live Blender Viewport on Your iPhone
When you start tracking, the Blender viewport streams back to the iPhone over UDP 9091 as a low-bitrate JPEG. You see what the camera sees, framed on your phone, while you operate.
Adaptive Quality since v1.5.2
| AUTO | Default. Self-throttles between tiers based on actual encode time. Hysteresis state machine prevents oscillation between modes. |
| HIGH | 320×180 @ q70 — sharpest preview, highest cost. Best for light scenes. |
| MEDIUM | 240×135 @ q60 — balanced. |
| LOW | 144×81 @ q50 — lowest cost. Heavy scenes drop here automatically in AUTO. |
Bidirectional Timeline since v1.4.4
Scrub the Blender timeline from your phone — the iPhone shows the current frame and lets you tap-seek without leaving the device. Frame info flows back over the same UDP 9091 socket as the preview stream.
Cycles-Friendly Preview since v2.4.0
The preview pipeline now works in Cycles scenes via the SOLID-mode preview path, instead of being hard-blocked as in earlier versions.
Post FX extended in v1.3.0
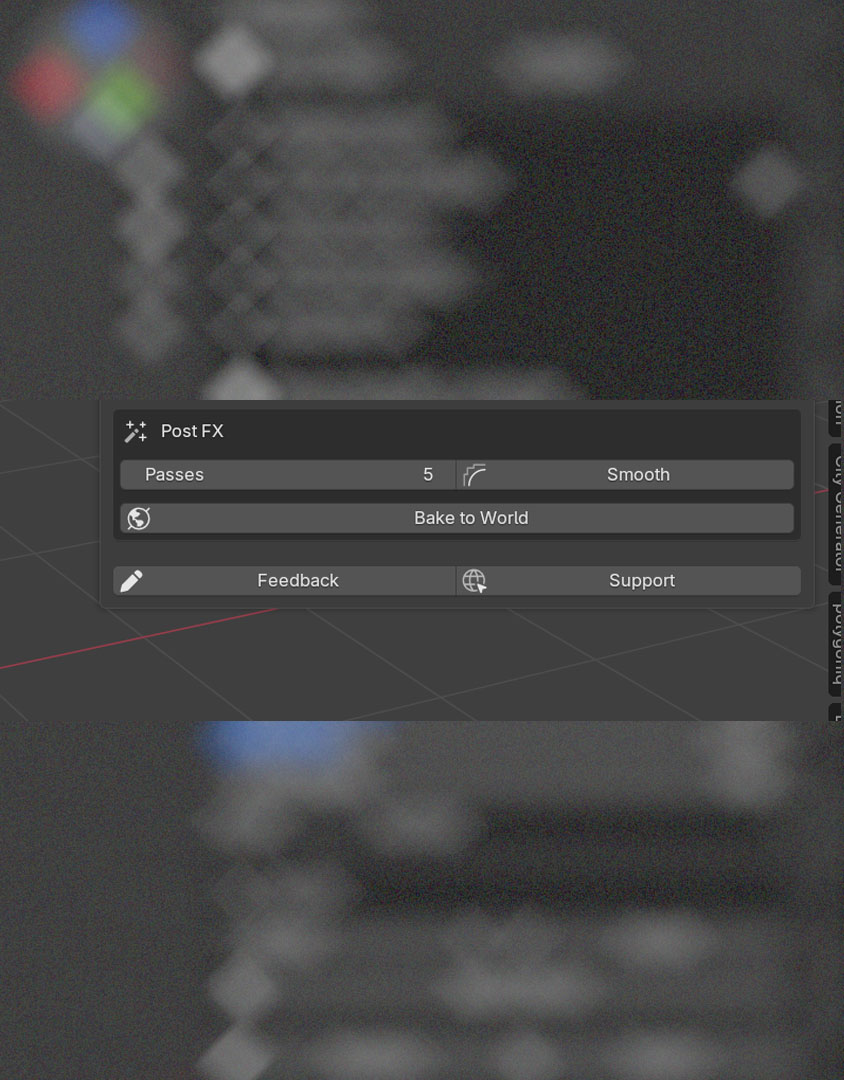
Post-Recording Tools
Post FX tools work on your recorded keyframes after you stop tracking. They help you polish your camera animation.
Smooth — Applies a smoothing filter to your recorded keyframes to remove residual hand shake.
| Passes | Number of smoothing iterations (1 – 50, default 5). More passes = smoother result. Each pass reduces high-frequency noise while preserving the overall motion path. |
| Algorithm | Quaternion-space 1-2-1 kernel — handles rotation correctly without 180° flips or gimbal artifacts. |
Ctrl+Z if you over-smooth. Start with 5 passes and increase gradually.
Z-Drift Removal — Non-destructive compensation for ARKit's natural vertical drift on long takes. since v1.3.0
| Method | Linear — subtracts a straight drift line from first to last Z keyframe. Best for level-ground walk-throughs where you didn't intentionally change height. High-pass — zero-phase double-pass IIR filter that removes only the slow trend. Preserves intentional motion like walk bounce or head tilt. Requires ≥5 keyframes. |
| Strength | 0.0 – 1.0. How aggressively the drift is removed. |
| Apply | First Apply captures a snapshot of your original Z values. Changing Strength and re-applying recomputes from the snapshot — effects don't stack. |
| Reset | Restores the snapshot and clears it. Greyed out when no valid snapshot exists. |
Bake to World — Converts a parented camera's animation into world-space keyframes.
| When to use | After you're happy with a parented camera animation and want to remove the parent while keeping the exact same motion. |
| What it does | Bakes the final world-space position and rotation on every frame, then clears the parent. The camera follows the exact same path but is now independent. |
Phone Notifications since v2.2.0
Blender Talking Back to the iPhone
Sometimes Blender needs to tell the operator something while they're holding the phone — a tracking warning, an unsupported configuration, an end-of-take confirmation. BMBanner is the channel for that.
| Transport | BM:NOTIFY:type:msg text command on UDP port 9091 (same socket as preview). |
| Types | info — neutral. warn — amber. error — red. |
| Examples | "Preview not supported with Cycles + Rendered viewport.", "Tracking paused — phone disconnected.", "Recording flushed.". |
| On the phone | Banner appears at the top with the message, auto-dismisses after a few seconds, can be tapped away. |
Experimental since v2.5.1
Opt-In Candidate Fixes
Two opt-in toggles live under Tracking → Experimental. Both default off. Enable them only if you've seen periodic micro-bumps in recorded camera motion that aren't present during live tracking. They operate at different points in the recording pipeline and can be on simultaneously.
Time-Synced Recording since v2.5.1
At 24 fps recording on a 60 Hz timer, keyframes naturally land at alternating 2-tick / 3-tick gaps (50 ms / 33 ms), producing an 8 ms drift that alternates per frame. That drift can alias with OS scheduler or Wi-Fi patterns into visible micro-bumps.
When the toggle is on, each keyframe's pose is interpolated from a rolling buffer to land at the frame's exact intended time slot — jitter from the timer tick stops showing up in the recording.
Smooth Wi-Fi Stalls since v2.5.2
During the iPhone's DTIM beacon cycle (~666 ms), the Wi-Fi radio briefly suspends; UDP pose updates don't reach the addon; the smoothing pipeline settles to a fixed point; the recording captures runs of duplicate poses.
This toggle scans the recording buffer at flush-time for runs of duplicate poses and replaces them with linear interpolation between the surrounding real-motion poses. A pattern-detection guard prevents false-positive smoothing of intentional pauses (a deliberate hold gets a different signature than a Wi-Fi stall).
iPhone — Connect Screen
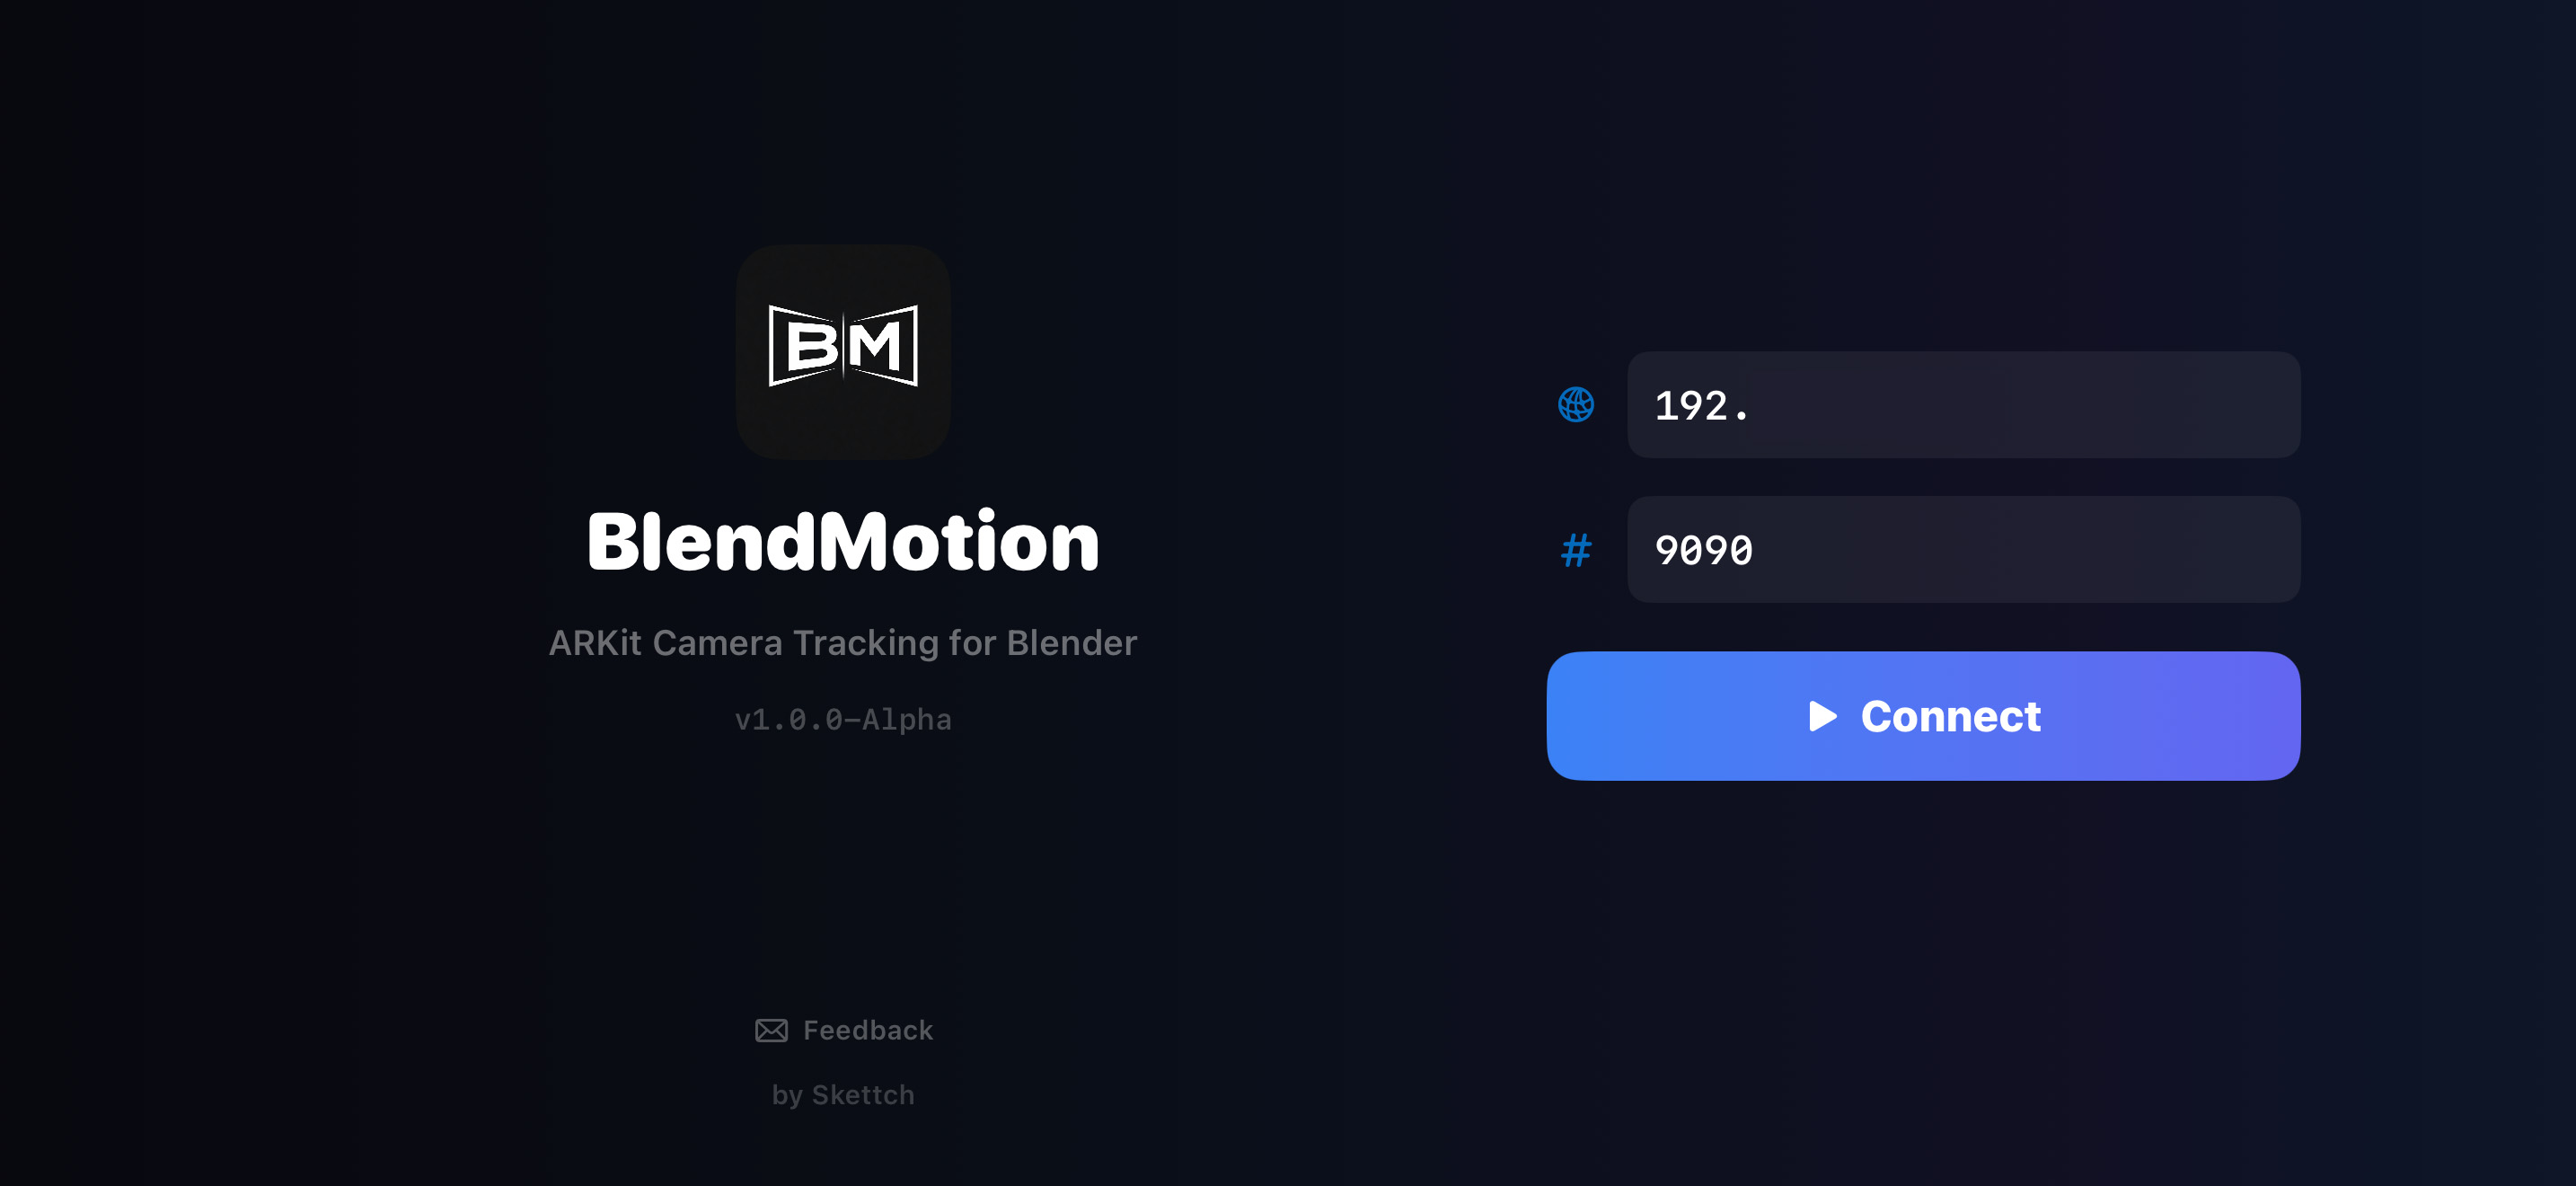
Connecting to Blender
This is the first screen you see when you open BlendMotion on your iPhone. Hold your phone in landscape orientation before connecting.
| IP Address | Enter your computer's local IP address here. The easiest way: copy it from the Preflight Checklist in Blender (click the 📋 button) and paste it here. |
| Port | The UDP port number. Default is 9090. Must match the port set in the Blender addon panel. |
| Connect | Tap to start sending motion data to Blender. Make sure the Blender addon is running (Start pressed) before you connect. |
iPhone — Tracking Screen redesigned in v2.3.0
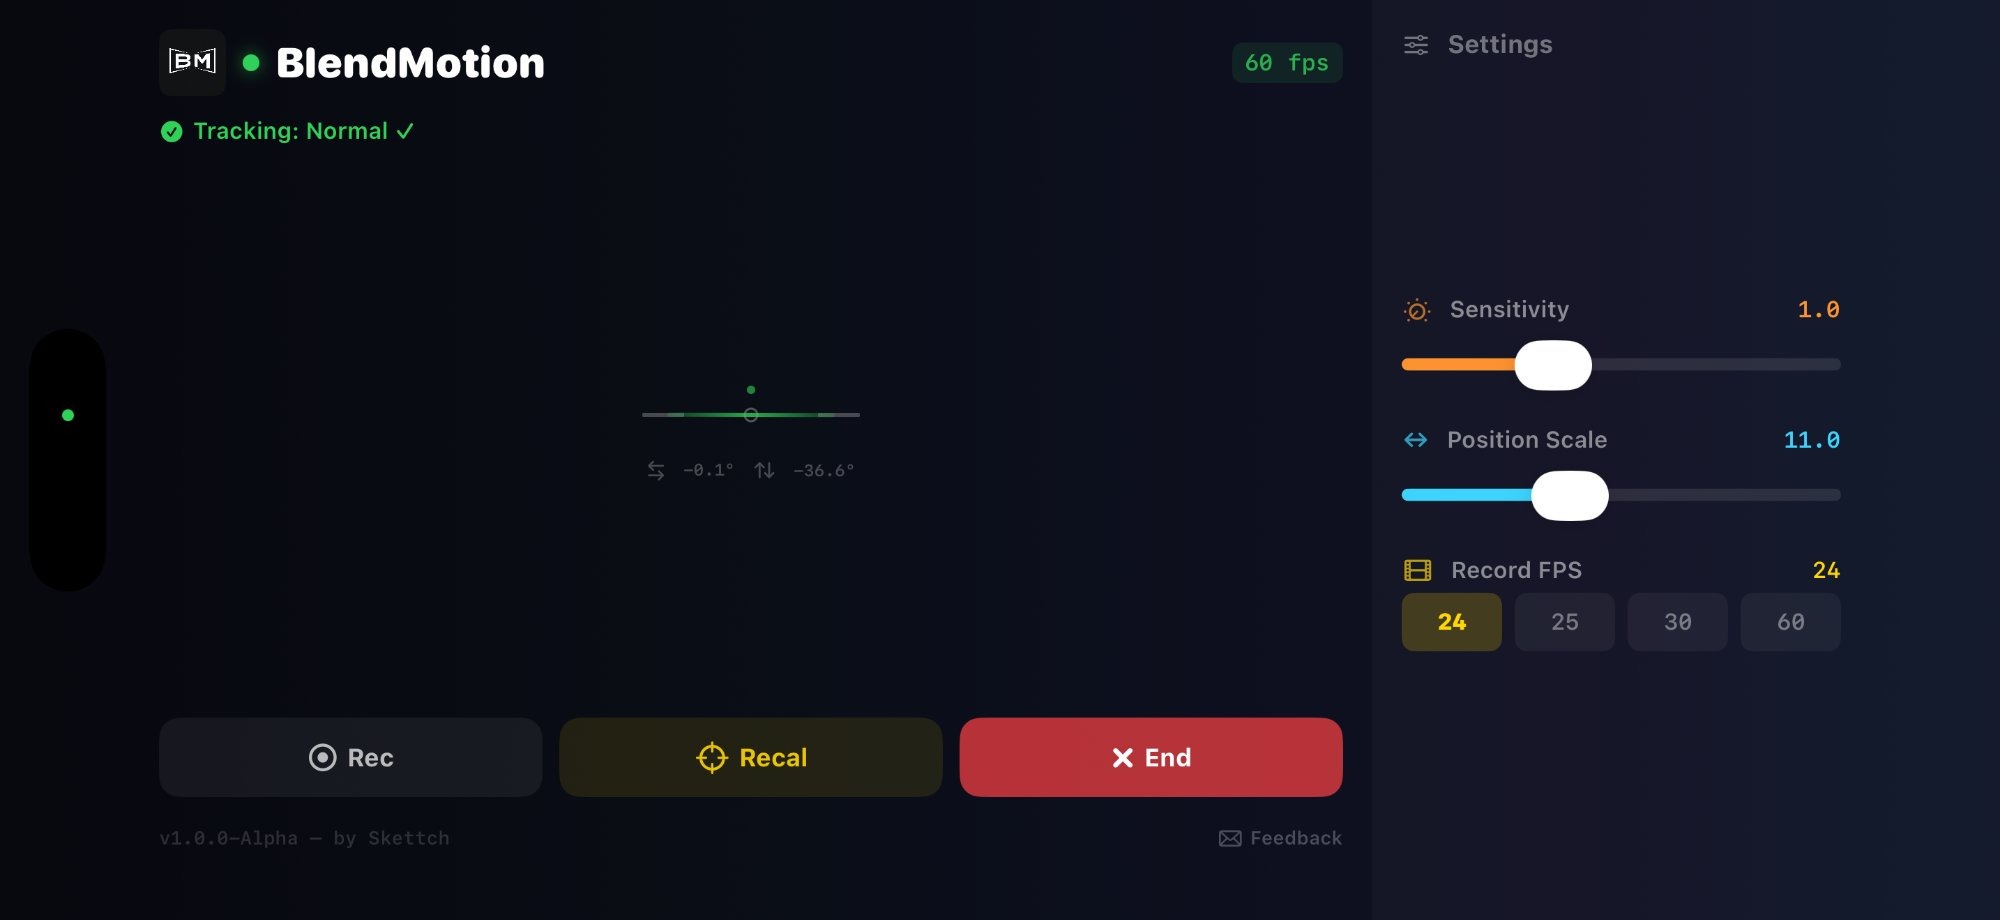
Live Tracking HUD
Once connected, the tracking screen shows real-time feedback and gives you control over recording and calibration.
Status Bar (top)
| 🟢 Green dot | Connected and sending data to Blender |
| 60 fps | ARKit tracking frame rate. Green = good performance. |
| Tracking: Normal ✓ | ARKit tracking quality. "Normal" means stable tracking. "Limited" or "Initializing" means the camera needs better visual features — add more light or point at textured surfaces. |
Horizon Indicator (center)
The crosshair and horizon line show your phone's current orientation. The rotation values below it (↺ roll and ↕ pitch in degrees) help you monitor your movements in real time.
Settings (right panel)
| Sensitivity | Same as the Blender slider — controls rotation multiplier. Adjust on-the-fly without going back to Blender. |
| Position Scale | Same as the Blender slider — controls position multiplier. Useful for quick adjustments mid-session. |
| Record FPS | Choose the keyframe recording rate: 24, 25, 30, or 60 fps. Should match your Blender scene FPS for smooth playback. |
Action Buttons (bottom)
| Rec | Start recording keyframes. While recording, every frame is captured to the Blender timeline. Tap again to stop recording. |
| Recal | Remote recalibrate — resets the origin point to your current hand position. Same as clicking Recalibrate in Blender, but you don't need to touch the computer. |
| End | Disconnect from Blender and return to the connect screen. |